

How to drive an Eaton 18-Speed Roadranger
Eaton’s 18-Speed Roadranger Driver’s Instruction manual available for download at end of article.
Driving a constant mesh transmission like a 13-speed or 15-speed Roadranger transmission correctly used to be a fundamental part of truck driving, and old school truck drivers took great pride in the way they swapped cogs meticulously without grating any gears.
 It’s worth remembering too, that those old trucks with the 13 and 15-speed Roadrangers were not as powerful as today’s trucks, which meant drivers were constantly required to change gears.
Times have changed, roughly 50 percent of today’s trucks have auto boxes, and a driver’s ability to change gears in a manual transmission is no longer a prerequisite to becoming a truck driver. However, many believe that being able to change gears in an 18-speed Roadranger gearbox is still a skill worth mastering…
When Merle Haggard penned the words to his famous single that paid homage to the truck driver, Movin-On, in 1975, he captured the real spirit of trucking that still holds true today: “The white line is the life line to the nation”. That song became the theme song for the NBC-TV hit series Keep Movin’ On in the mid-seventies.
To a certain degree, his line: “Jammin’ gears has got to be a fever, ‘cause men become addicted to the grind,” is true for many drivers.
 However, when Haggard mentioned “Jammin’ gears,” it was a slang reference to the time used to describe the action of changing gears in crash or constant-mesh gear boxes, which old seasoned truck drivers mastered, slipping each gear change through smoothly and silently without any grating sound.
Swapping gears properly in an Eaton Roadranger transmission is a skill that professional drivers pride themselves in.
Jammin’ gears is not, and never has been, the method of how it’s done, although if you stand at a roundabout somewhere near a transport hub in any major city for half an hour, you’ll hear plenty of gears being jammed.
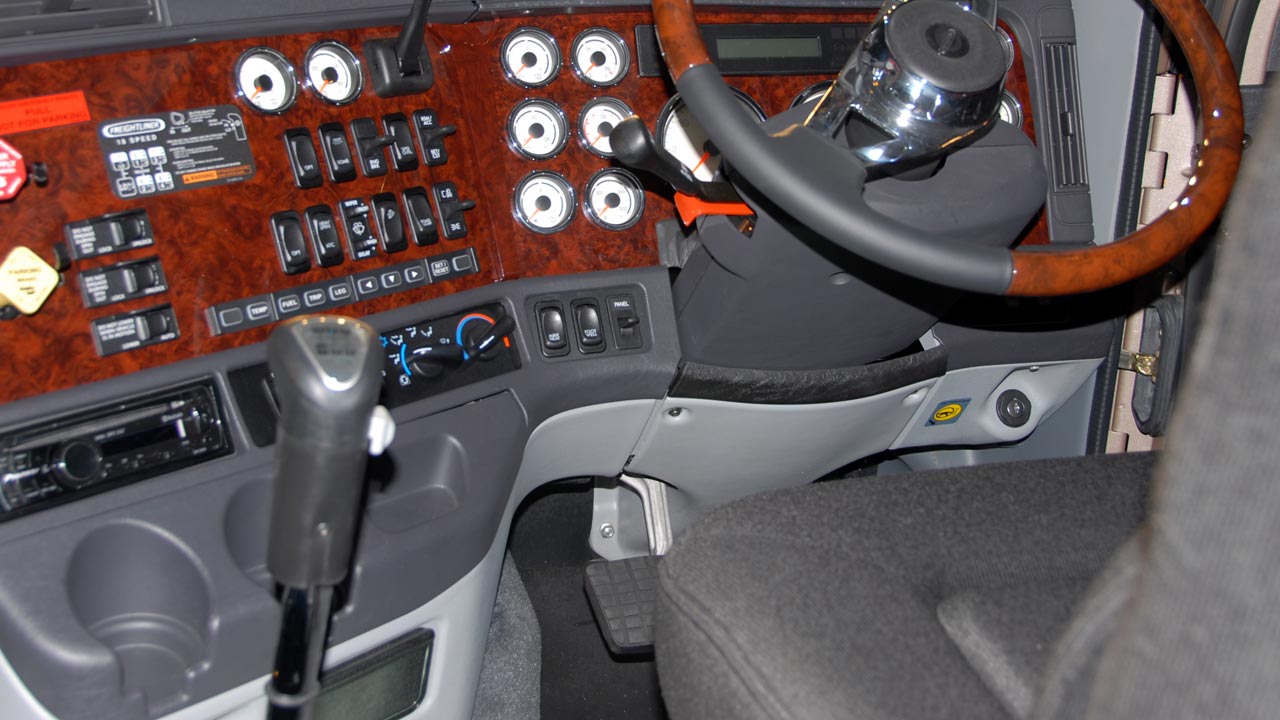
Roadranger transmissions are a constant mesh style transmission, which means that all the forward gears are constantly in mesh at all times. In this article we’ll be using the more modern and common 18-speed Roadranger in our example, however the principles described in article are transferable to other transmissions in Eaton’s Roadranger Fuller range.
 Basic Operation
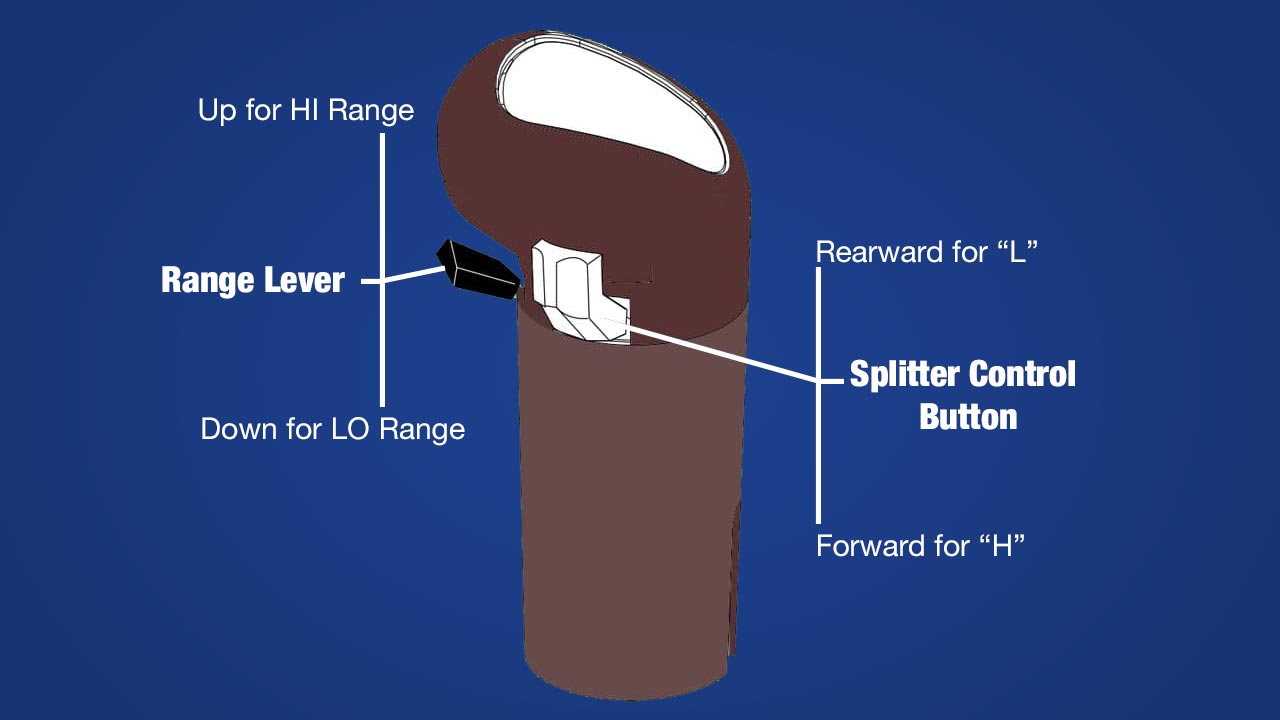
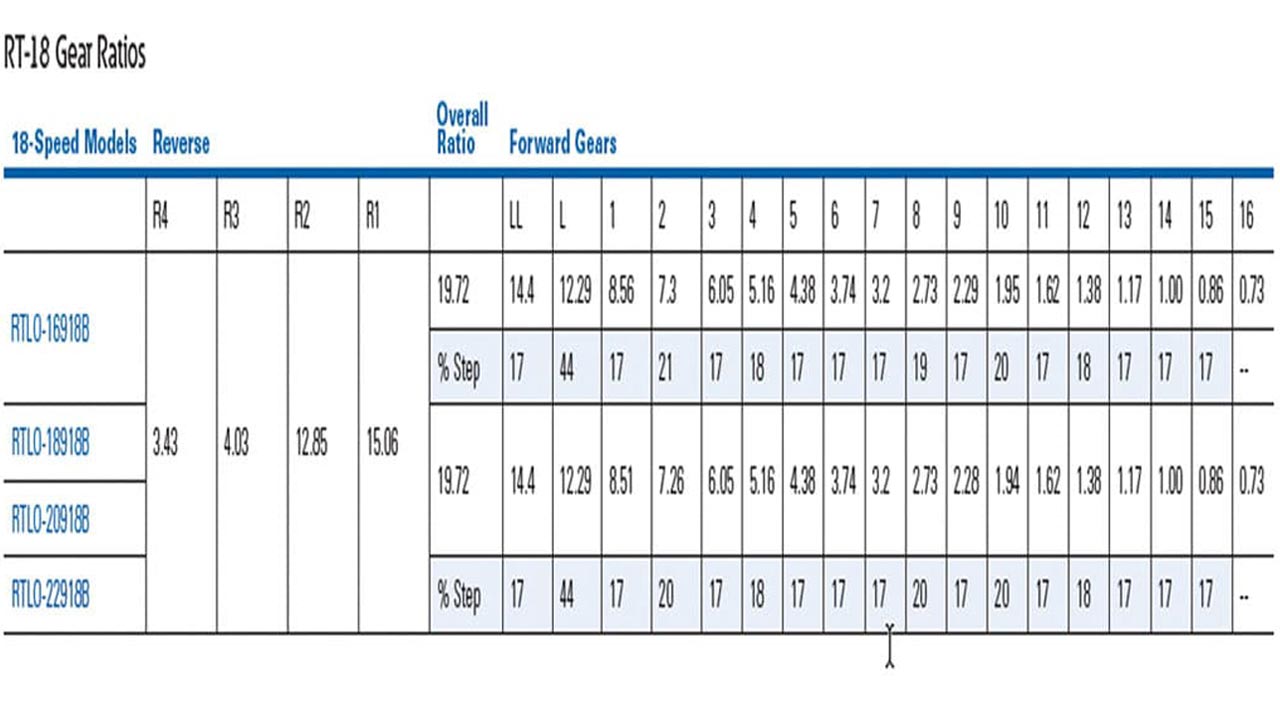
Models in this series provide eighteen forward speeds and four reverse, consisting of a five-speed front section and a four-speed auxiliary section. The auxiliary section contains LO and HI range ratios, plus a splitter gear.
The LO position in the front section is used only as a starting gear, it is never used when the transmission is in HI range.
The other four ratios are used once in LO range and once again in HI range.
However, each of the five ratios (LO-1-2-3-4) in LO range, and each of the four ratios (5-6-7-8) in HI range can be split with the splitter gear giving a total of 18 different ratios.
After shifting out of the LO position, you use the common ‘H’ shift pattern. LO range and HI range are selected with the range lever, commonly located at the front of the gear selection knob. It is used once during the upshift sequence and once during the downshift sequence.
 Range Shift
Always preselect the range shift just before making the selection. After preselection, the transmission automatically makes the synchroniser range shift as the shift lever passes through neutral. Preselecting all range shifts prevents damage to the transmission and provides for smoother shifts.
 Splitter Shift
When in LO or HI range, the ratios can be split by using the splitter control button.
The LO range ‘L’/rearward position provides for LO through to 4th gears; the LO range ‘H’/forward position splits each of those speeds (providing 10 ratios in LO range). The HI range “L”/rearward position provides for 5th through to 8th gears; the HI range ‘H’/forward position splits each of those speeds (providing 8 ratios in HI range) – that’s how 18 progressive ratios can be obtained.

To buy this T-Shirt Click Here.
Clutch Brake
(Used with pull-type clutches) – The clutch brake is applied by fully depressing the clutch pedal to the floor board. When applied the brake slows down and can stop the transmission front box gearing. It is a disc-type brake incorporated into the clutch and transmission drive gear assemblies.
Never use the Clutch Brake when upshifting or downshifting. Use only for initial gear engagement when the vehicle is standing still.
Double-Clutching Procedure
- Release accelerator.
2. Depress clutch pedal slightly to break torque enough to move the shift lever to neutral.
Note: Avoid depressing the clutch pedal too far and contacting the clutch brake.
3. When the shift lever is in neutral, let up on clutch pedal.
Note: Engaging the clutch with the shift lever in the neutral position connects the transmission input gearing to the engine. This allows the operator to speed up or slow down the transmission input gearing to properly match the desired gear speed to the current road speed.
a. For upshifts – allow engine RPM to decrease to match road speed.
b. For downshifts – increase engine RPM to match road speed.
4. At the correct engine RPM, depress the clutch pedal slightly and at the same time, move the shift lever into the desired gear.
5. Let up on the clutch pedal and apply accelerator.
Skip Shifting
Skip shifting is an important technique to learn because it will save you a lot of work, energy and fuel.
At the end of the day, if the only gear changing you do is step changing, (going through each gear on the way up and down) then you will be changing gears up to 1200-1400 times a day. That is a lot of expended energy. By integrating skip changing into your repertoire you can reduce your gear changing by up to 50 per cent.
To skip change successfully you will need to do as follows:
- Accelerate the engine to 1700 rpm.
2. At 1700 rpm, simultaneously release accelerator, depress clutch and move the gearstick to the neutral position.
3. Release clutch and position gearstick over the gear you are skipping to.
4. When engine revs have dropped to 1000 rpm, depress clutch and move
gearstick into gear. (If the revs drop below 1000rpm, release clutch, rev
engine to 1500, depress clutch and put into gear).
5. Release clutch smoothly.
Remember. Skip changing is always done by moving the gearstick in the same plane, i.e. from left to right and right to left (Not fore and aft)
You can skip from 1st to 3rd from 3rd to 5th, from 5th to 7th (All the odd gears are in the forward part of the shift pattern).
Or from 2nd to 4th, from 4th to 6th from 6th to 8th (All the even gears are in the rearward part of the shift pattern).
It is important that when skip changing you do not attempt to put the gearstick into gear too early. When you make a step change, (the next gear in progression) the emphasis is on making the change quickly (on a count of 1,2).
Skip shifting is different. If you make the change too quickly the gears will clash and you’ll hear the grinding sound, so one of the easiest way to ensure a smooth change is to say to yourself: “Out wait in” as you are changing gear, and move the stick into gear as you say “in”. Another way is to count “1,2,3,” this will give you the time frame required for the gears to mesh without clashing or grinding.
 Practice Makes Perfect
At the end of the day, once you get the basic shifting sequence down pat, it’s just practice that will make your Roadranger changes look and sound like an old hand. However, remember, every engine and transmission combination is different and might require different revs to get the gears to slip in perfectly.
One handy hint, when you’re asked to drive an unfamiliar truck, is to ask the owner or the previous driver how it drives and what revs it likes best for shifts and it will make your transition quicker and more enjoyable.
It’s not uncommon to discover that even trucks from the same manufacturer and have the same spec, engine, transmission and rear axle ratio can have different idiosyncrasies when it comes to how they change gears.
But that’s the wonderful thing about driving a Roadranger!
To download Eaton’s Driver instruction manual for the RTLO XX918B Roadranger CLICK HERE.

